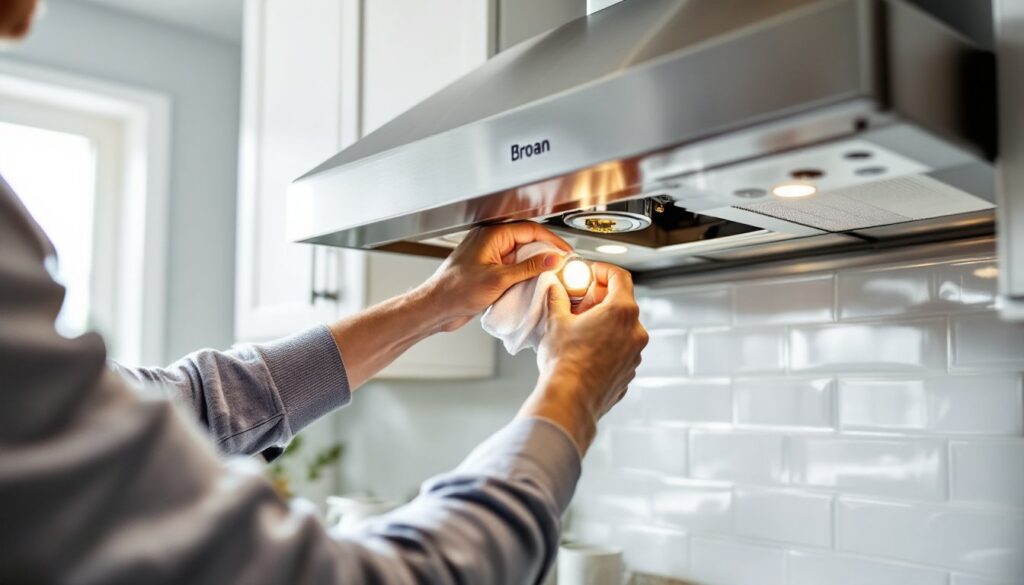
A burned-out light in your Broan range hood turns every dinner prep into a shadowy guessing game. The good news? Swapping the bulb is one of the simplest kitchen fixes you can tackle yourself, if you know which bulb to buy and how to install it safely. Broan hoods use a variety of bulb types depending on model and age, from old-school incandescents to modern LEDs, and grabbing the wrong one means another trip to the hardware store. This guide walks through identifying your bulb type, removing the old one, and troubleshooting common headaches so you can get back to cooking under proper light.
Table of Contents
ToggleKey Takeaways
- Identify your Broan range hood light bulb type (incandescent, halogen, or LED) by locating the model number on the metal tag inside the hood and checking your owner’s manual or the Broan support page.
- Always shut off the circuit breaker before replacing a Broan range hood light bulb, and verify the correct voltage (120V vs. 12V) and wattage limits to avoid electrical hazards or fire risks.
- LED bulbs offer superior energy efficiency and longevity, lasting 25,000 to 50,000 hours while using 75% less energy than incandescent alternatives, making them the best long-term investment.
- Handle halogen bulbs with a clean cloth or gloves to prevent skin oils from damaging the quartz envelope and causing premature failure.
- If a new bulb won’t light or flickers, check the socket for corrosion or damage, confirm you’ve installed the correct base type and voltage, and clean grease filters to prevent heat buildup that shortens bulb life.
- Purchase OEM bulbs from Broan’s official parts site for guaranteed compatibility, or buy from major retailers like Home Depot or Lowe’s if you need the part immediately; prioritize brands like Philips or GE and verify enclosed-fixture ratings for LEDs.
Understanding Broan Range Hood Light Bulb Types
Broan range hoods manufactured over the past few decades use three main bulb technologies: halogen, LED, and incandescent. Each has distinct characteristics that affect brightness, heat output, energy consumption, and replacement cost.
Older Broan models (pre-2010) typically came with 40W or 50W incandescent bulbs or 20W to 50W halogen capsule bulbs. Incandescents produce warm, yellowish light but burn out quickly, expect 1,000 to 2,000 hours of life. Halogen bulbs last longer (2,000 to 4,000 hours) and emit whiter, brighter light, but they run hot enough to require heat-resistant sockets and careful handling.
Newer Broan hoods often ship with integrated or replaceable LED modules. LEDs draw far less power (typically 3W to 10W for equivalent brightness), last 25,000 to 50,000 hours, and stay cool to the touch. Some Broan models use standard E26 screw-base LEDs you can buy anywhere: others use proprietary G4 or GU10 pin-base LEDs that require Broan-specific or compatible aftermarket replacements.
Knowing which technology your hood uses is critical. Installing a halogen bulb in a socket rated only for incandescent wattage can overheat wiring and trip breakers or, worse, create a fire hazard. Always check the maximum wattage stamped inside the socket or printed on the hood’s rating label.
Halogen vs. LED vs. Incandescent Bulbs
Halogen bulbs are compact, bright, and color-accurate, making them popular in task lighting. They’re dimmable and reach full brightness instantly. But, they generate significant heat, enough to burn skin on contact, and their quartz envelopes are sensitive to oils from bare fingers, which can cause premature failure. Always handle halogen bulbs with a clean cloth or gloves.
LED bulbs win on efficiency and longevity. A 5W LED can match the output of a 40W incandescent, slashing energy bills and reducing hood motor strain from excess heat. Most LEDs are not dimmable unless specifically labeled as such, and cheaper models may flicker or cast a harsh, bluish tint. Look for LEDs rated 2700K to 3000K (warm white) for kitchen use, and verify compatibility if your hood has a dimmer switch.
Incandescent bulbs are the dinosaurs of the bunch, cheap upfront but costly over time due to frequent replacement and high wattage. They’re fully dimmable and produce a pleasant warm glow, but modern building codes and energy standards have phased them out in many jurisdictions. If your Broan hood still uses incandescents, consider upgrading to LED equivalents to cut energy use by 75% or more.
One practical note: if you’re replacing a halogen with an LED, ensure the LED is rated for enclosed fixtures. Range hood housings trap heat, and non-enclosed-rated LEDs can overheat and fail early.
How to Identify the Right Bulb for Your Broan Model
Broan stamps the model number on a metal tag inside the hood, usually on the underside near the filters or on the interior blower housing. It looks something like E64, QP3, or 273000 series. Flip off the circuit breaker for the hood, remove the grease filters (they slide or pop out), and locate that tag. Write down the full model number.
Once you have the model, visit the Broan support page or check your owner’s manual (often available as a PDF download). The manual lists compatible bulb types, wattage limits, and base configurations. If you don’t have the manual, a quick search for “Broan [model number] bulb replacement” usually surfaces the spec.
Common Broan bulb bases include:
- E26 (medium screw base): Standard household bulb socket. Accepts most LED and incandescent A15 or A19 bulbs.
- E12 (candelabra base): Smaller screw base, often used in compact hoods. Requires candelabra-style bulbs.
- GU10 (twist-and-lock): Bi-pin base with two pins spaced 10mm apart. Typical in newer Broan models with halogen or LED spotlights.
- G4 (capsule): Tiny bi-pin base (4mm spacing) for halogen capsule bulbs, common in slimline hoods.
Measure the old bulb if the base type isn’t obvious. Bring it to the hardware store or snap a photo to compare. Also note the bulb’s shape, MR16 spotlights, T3 or T4 tubes, and A15 globes are all used in various Broan hoods.
Pay attention to the voltage rating. Most Broan hoods run on standard 120V AC household current, but some older or specialized models use 12V halogen systems with a built-in transformer. Installing a 120V bulb in a 12V socket (or vice versa) will either blow the bulb instantly or fail to light.
If you’re upgrading from halogen to LED, cross-reference the lumen output. A 20W halogen capsule produces roughly 300 to 400 lumens, so look for a 3W to 5W LED in the same range. The home improvement advice at Bob Vila offers detailed appliance replacement guides if you need additional model-specific help.
Step-by-Step: Replacing Your Broan Range Hood Light Bulb
Before touching anything electrical, shut off the circuit breaker for the range hood. Don’t rely on the hood’s wall switch alone, you need zero power to the unit. Verify the power is off by trying the light and fan switches.
Step 1: Remove the grease filter(s). Most Broan filters slide toward the front or sides, then drop down. Some twist-lock or have release tabs. Set them aside.
Step 2: Locate the bulb cover or lens. Many Broan hoods have a glass or plastic lens held by spring clips, screws, or a twist-lock ring. For screw-on covers, turn counterclockwise. For spring-clip lenses, gently squeeze or pry the clips inward while pulling the lens down. Be patient, plastic clips can snap if forced.
Step 3: Remove the old bulb.
- Screw-base bulbs (E26, E12): Turn counterclockwise. If stuck, use a rubber jar opener for grip.
- GU10 twist-lock: Push in gently, then rotate counterclockwise about a quarter turn and pull straight out.
- G4 capsule: Pull straight out from the socket. If it resists, rock it side to side slightly, don’t yank or you may damage the socket pins.
If the bulb is hot (it shouldn’t be if you waited a few minutes), use a dry cloth. For broken bulbs, wear safety glasses and gloves, and use needle-nose pliers to grip the metal base. Some pros recommend pressing a halved potato into the broken bulb base for leverage, it works surprisingly well.
Step 4: Install the new bulb. Handle halogen and incandescent bulbs with a clean cloth to avoid skin oils. For LEDs, clean handling is fine.
- Screw-base: Turn clockwise until snug. Don’t overtighten, you’ll strip plastic sockets.
- GU10: Insert pins into the socket, push in, and rotate clockwise until it locks.
- G4: Align pins and push straight in until fully seated.
Step 5: Replace the lens and filters. Snap or screw the lens back into place, then reinstall grease filters. Double-check that everything is secure, a loose lens can vibrate and rattle during fan operation.
Step 6: Restore power and test. Flip the breaker back on and test the light. If it doesn’t work, proceed to the troubleshooting section below.
Safety notes: Always use bulbs within the hood’s maximum wattage rating. Exceeding it can melt plastic components or ignite grease buildup. Wear safety glasses when working overhead, especially if removing a broken bulb. If your Broan hood is hardwired (no plug), and you’re unsure about electrical safety, call a licensed electrician.
Common Issues and Troubleshooting Tips
New bulb won’t light: First, confirm the circuit breaker is on and the hood’s fan works (proving the unit has power). Remove the bulb and inspect the socket for corrosion, melted plastic, or bent contacts. If the socket looks damaged, it may need replacement, Broan sells socket assemblies for most models. Check that you installed the correct voltage (120V vs. 12V) and base type. Test the bulb in another fixture if possible to rule out a DOA (dead on arrival) bulb.
Bulb flickers or dims: Flickering LEDs often indicate incompatibility with dimmer switches or low-quality bulbs. Broan hoods with older dimmer modules may not play nicely with non-dimmable LEDs. Swap in a dimmable LED rated for your wattage, or bypass the dimmer entirely if you don’t need that feature. Loose connections in the socket can also cause flickering, turn off power and gently bend the center contact tab upward for better pressure.
Bulb burns out quickly: If you’re replacing bulbs every few weeks, heat buildup is usually the culprit. Verify you’re not exceeding the hood’s wattage rating. Check that the blower motor and filters are clean, restricted airflow traps heat. Kitchen appliance reviews from The Kitchn highlight how neglected range hood maintenance can shorten bulb life. Also, vibration from an unbalanced blower can shorten incandescent and halogen lifespan: LEDs are far more vibration-resistant.
Can’t remove the bulb or lens: For stuck screw-base bulbs, try a rubber bulb changer tool (available at hardware stores) or wrap a rubber band around the bulb for grip. If a twist-lock lens won’t budge, look for hidden screws or an alternate release mechanism, some Broan models have a small tab you press while twisting. Consult your model’s manual or the Broan support site for lens removal instructions.
Socket is melted or discolored: This indicates overheating, likely from using a bulb that exceeded the wattage limit. Do not install a new bulb until you replace the socket assembly. Continuing to use a compromised socket is a fire hazard. Broan socket replacements are model-specific and require basic wiring (matching black to black, white to white, green or bare copper to ground). If you’re uncomfortable with this, hire an electrician. This is not structural work, but it does involve line-voltage wiring.
LED buzzes or hums: Some LEDs emit audible noise when used with dimmers or transformers. Try a different LED brand or model, quality varies widely. If the hum persists, the hood’s transformer or dimmer module may need replacement.
Where to Buy Broan Range Hood Replacement Bulbs
Broan’s official parts site is the most reliable source for OEM (original equipment manufacturer) bulbs and ensures perfect compatibility. Search by model number, and you’ll see exact replacements, helpful for proprietary LED modules or oddball base types. Shipping can take a few days, so it’s not ideal for urgent fixes.
Home improvement retailers like Home Depot, Lowe’s, and Menards stock common Broan bulb types (E26 LEDs, GU10 halogens, G4 capsules) in their lighting aisles. Bring your old bulb or model number. Staff can cross-reference compatible options. Prices are usually competitive, and you walk out with the part same-day.
Amazon and online suppliers offer broad selection and fast shipping, especially for less common bases or bulk purchases. Read reviews carefully, counterfeit or low-quality LEDs are common. Stick with known brands like Philips, GE, or Sylvania for screw-base LEDs, and verify the product is rated for enclosed fixtures. Some vendors sell Broan-compatible LED retrofit kits that replace entire socket assemblies for a cleaner, longer-lasting upgrade.
Local hardware stores often carry universal bulb types and can be a quick fix. But, they may not stock specialty bases like G4 capsules or 12V halogens. Call ahead to check.
Electrical supply houses cater to contractors and carry a wider range of commercial-grade bulbs, including higher-CRI (color rendering index) LEDs that make food look better under your hood lights. Prices run higher, but quality and lifespan are typically superior.
When shopping, prioritize bulbs with good return policies, especially for online purchases, so you can swap them out if compatibility issues arise. Tested product recommendations from Good Housekeeping can help narrow down quality LED brands if you’re upgrading from halogen.
Cost expectations (as of 2026): Basic incandescent or halogen bulbs run $3 to $8 each. Quality LED replacements range from $8 to $20 per bulb, depending on features (dimmable, high CRI, enclosed-rated). Proprietary Broan LED modules can cost $25 to $50 but last decades. Prices vary by region and retailer, so compare a few sources before buying.
Conclusion
Replacing a Broan range hood light bulb is a straightforward DIY win that restores visibility and safety to your kitchen. Identify your bulb type by checking the model number and socket, respect wattage and voltage ratings, and always kill power at the breaker before working. Upgrading to LEDs cuts energy use and eliminates the hassle of frequent bulb swaps. Keep the grease filters clean to prevent heat buildup, and don’t ignore signs of socket damage. With the right bulb and a few minutes of careful work, you’ll be back to cooking under clear, bright light.