You built a bucket mouse trap, maybe the classic spinning bottle design or a simple balance-beam variant, but after three nights, the bait’s untouched and the bucket’s empty. Frustrating, especially when online videos make it look foolproof. The truth is, bucket traps can be highly effective, but only when setup, placement, and bait align with actual mouse behavior. Most failures stem from a handful of avoidable mistakes: wrong bait, poor ramp design, or placement in areas mice simply won’t travel. This guide walks through exactly why bucket traps fail and the proven adjustments that turn them into reliable mouse-catchers.
Table of Contents
ToggleKey Takeaways
- A bucket mouse trap fails primarily due to poor bait selection, incorrect ramp design, or improper placement—not because the trap concept is flawed.
- Use high-fat, high-protein baits like peanut butter or hazelnut spread with fresh applications every 24–48 hours; avoid the cheese myth and don’t place bait on the ramp itself.
- Design your ramp at a gentle angle under 45 degrees with textured grip (burlap or duct tape), extending 1–2 inches over the bucket rim and positioned near walls where mice travel.
- Ensure the spinning mechanism rotates freely with a water or antifreeze depth of 4–6 inches, and test the trap for 3–5 consecutive nights before relocating to different areas.
- Eliminate competing food sources by sealing containers, sweeping floors, and removing clutter—a bucket trap is only attractive when it’s the only readily available meal.
- Consider snap traps, electronic traps, or professional pest control for small children, pets, or heavy infestations where daily bucket maintenance isn’t feasible.
Understanding How the Bucket Mouse Trap Should Function
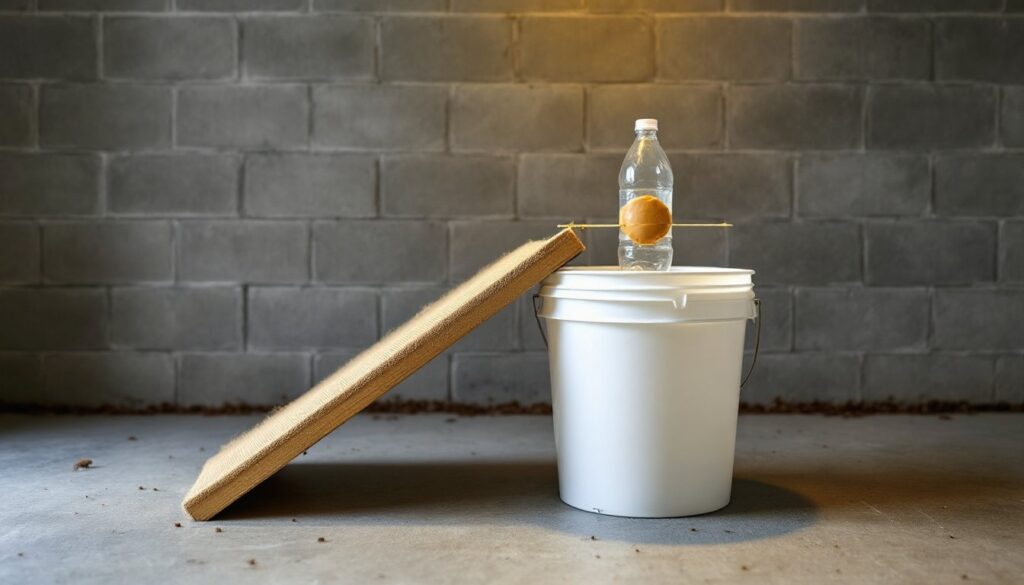
A bucket mouse trap works by exploiting a mouse’s natural curiosity and willingness to take risks for food. The basic design uses a 5-gallon bucket (standard 14–15 inches tall) filled with several inches of water or antifreeze to prevent escape. A bait mechanism, typically a soda can, dowel, or plastic bottle, sits horizontally across the bucket’s rim, balanced so it spins when a mouse steps onto it.
The mouse climbs a ramp (usually a piece of scrap lumber, a ruler, or textured cardboard), walks across the spinning mechanism toward the bait, and falls into the liquid below when the device rotates. The ramp must allow easy two-way access initially so mice feel comfortable using it: once they’re confident, they’ll venture farther onto the trap.
Key to success: the mechanism must spin freely but not so easily that it rotates before the mouse reaches the center. Most builders use a wire coat hanger or metal rod threaded through the bottle or can, with the ends resting in notches cut into the bucket rim. If the mechanism binds or wobbles, mice sense instability and won’t commit. The water or antifreeze depth should be at least 4–6 inches, enough that a mouse can’t touch bottom and jump out, but not so deep it splashes audibly when they fall.
Common Reasons Your Bucket Trap Fails to Catch Mice
Poor Bait Selection and Placement
Mice aren’t universally drawn to cheese, that’s largely a cartoon myth. The most effective baits are high-fat, high-protein foods with strong scents: peanut butter, hazelnut spread, bacon grease, or sunflower seeds. Peanut butter works best because it requires the mouse to linger while eating, increasing the chance they’ll step onto the spinning mechanism.
Bait placement matters as much as the bait itself. Smear a dime-sized amount on the center of the spinning can or bottle. If you use seeds or solid bait, secure it with a dab of hot glue so mice can’t grab and run. Don’t overdo it, too much bait lets them nibble from the edge without committing their full weight. Also, avoid placing bait on the ramp: that rewards them before they reach the trap.
Stale or spoiled bait loses potency. Refresh it every 24–48 hours, especially in warm conditions. If you’re using peanut butter in a dry environment, it can harden and lose scent. A thin layer of fresh bait works better than a thick, dried-out glob.
Incorrect Ramp Angle and Accessibility Issues
Mice are excellent climbers, but they prefer gradual inclines. A ramp steeper than 45 degrees feels risky and discourages exploration. Use a piece of 1×4 or 1×6 lumber (actual dimensions ¾” × 3½” or 5½”) leaned at a gentle angle from the floor to the bucket rim. If the ramp is too smooth, like bare plywood or PVC, mice can’t grip it. Wrap the surface with burlap, window screen, or duct tape (sticky side out) to add texture.
Another common mistake: the ramp doesn’t reach the floor or sits flush against the bucket, creating a visible gap. Mice won’t jump to reach it. The bottom of the ramp should rest firmly on the ground, and the top should extend 1–2 inches over the bucket rim so they can step directly onto the spinning mechanism. Secure the ramp with painter’s tape or a small weight so it doesn’t shift when bumped.
Finally, consider placement. Mice travel along walls and in corners, they rarely cross open floor space. Position the bucket with the ramp against a wall where you’ve seen droppings or chew marks. If the trap is in the middle of a room or away from established mouse runways, it won’t see traffic no matter how perfect the setup.
Proven Fixes to Make Your Bucket Trap More Effective
Start by testing the spinning mechanism before setting the trap. Flick the can or bottle, it should rotate smoothly with minimal resistance. If it wobbles, the wire isn’t centered or the holes aren’t aligned. Re-drill the holes using a 1/8-inch bit, ensuring they’re exactly centered on each end. Some DIYers improve spin by adding a drop of cooking oil to the wire where it contacts the plastic.
Next, verify the water or antifreeze level. Use 4–6 inches measured from the bucket bottom. Too shallow, and a mouse might survive the fall and climb out (or worse, learn to avoid the trap). Too deep, and the splash becomes noisy, which can spook other mice. Antifreeze works better than water in unheated spaces, it won’t freeze, and the sweet smell may even act as an attractant, but keep it out of reach of pets and children.
Run the trap for 3–5 consecutive nights in the same spot before moving it. Mice are neophobic (afraid of new objects) and may avoid the setup initially. Once one mouse uses the ramp successfully to investigate, others follow the scent trail. If you’re catching nothing after five nights, relocate the entire setup to a different wall or room, focusing on areas with fresh droppings or gnaw marks.
For especially wary mice, create a “training phase.” Disable the trap by securing the spinning mechanism with tape, then leave bait on the ramp and bucket rim for 1–2 nights. This builds confidence. Once bait disappears consistently, remove the tape and arm the trap. This tactic is borrowed from professional pest control and mirrors techniques used in the best mousetraps reviewed by experts.
Finally, eliminate competing food sources. If mice have easy access to pet food, open trash, or pantry crumbs, they won’t risk a suspicious new contraption. Seal food in airtight containers, sweep floors, and remove clutter where mice nest. The trap becomes far more attractive when it’s the only meal in town.
When to Consider Alternative Mouse Control Methods
Bucket traps excel in garages, basements, barns, and sheds where a 5-gallon bucket isn’t a tripping hazard and the wet trap won’t damage flooring. They’re also ideal for heavy infestations, unlike snap traps, a single bucket can catch multiple mice in one night. But they’re not suited for every situation.
If you have small children or pets, the open bucket of liquid poses a serious risk. A toddler or curious dog can knock it over or, worse, fall in. In finished living spaces, snap traps or enclosed electronic traps are safer and less messy. Snap traps work well for low to moderate infestations and can be set along baseboards without the footprint of a bucket. Many DIYers share effective snap trap setups that complement or replace bucket designs.
Bucket traps also require daily checking. Leaving drowned mice in water for more than 24 hours creates odor and hygiene issues. If your schedule doesn’t allow daily maintenance, electric traps with quick-kill mechanisms or live-catch cage traps may fit better. Some homeowners adapt the bucket trap into a live-catch design by omitting the water, but you’ll need to release captured mice at least 2–3 miles away to prevent re-entry, and local regulations may restrict relocation.
For persistent infestations where traps alone aren’t cutting it, it’s time to address entry points. Mice squeeze through gaps as small as ¼ inch, about the diameter of a pencil. Seal cracks around pipes, vents, and foundation joints with steel wool and caulk or expandable foam. Check weather stripping on doors and repair damaged window screens. Structural fixes often matter more than any single trap design, and many step-by-step exclusion guides on sites like Instructables walk through the sealing process in detail.
If you’ve sealed entry points, run multiple traps for two weeks, and still see fresh droppings, consider calling a licensed pest control professional. Heavy infestations or mice nesting inside walls may require rodenticide bait stations or exclusion work that’s beyond typical DIY scope.
Conclusion
A bucket mouse trap isn’t magic, it’s mechanics and mouse psychology. When it fails, the culprit is usually bait, ramp design, or placement rather than the trap concept itself. Smooth spinning, fresh peanut butter, a textured ramp at the right angle, and positioning along active runways will turn most setups around. Give it a few nights, refresh bait daily, and pair trapping with good sanitation and entry-point sealing for lasting control.