Blink cameras deliver solid security at a budget-friendly price, but they’re only effective if they’re mounted properly. A camera pointed at the ground or knocked loose by wind isn’t doing anyone any favors. The mounting system determines whether your camera stays put through weather, provides the right viewing angle, and covers the vulnerable zones around your property. Whether you’re working with the included bracket or upgrading to a specialized mount, understanding your options and installation techniques will help you maximize coverage and avoid the common mistakes that leave blind spots in your security setup.
Table of Contents
ToggleKey Takeaways
- A proper blink camera mount must offer ball-joint articulation and weather resistance to ensure the 110-degree field of view covers your entry points effectively and protects against environmental damage.
- Mounting location is critical: position cameras 7 to 9 feet high at entry points, avoid backlighting, and clear obstructions to eliminate blind spots and reduce false motion alerts.
- Use appropriate fasteners for your surface type—wood screws for framing, masonry anchors for brick or stucco, and locate solid framing or sheathing behind siding to prevent sagging or pull-loose failures.
- Third-party blink camera mounts offer enhanced features and better value, but always verify compatibility with your specific model and check for stainless steel hardware and UV-resistant plastics.
- Test your installation by gently shaking the mounted camera to simulate wind, then periodically inspect fasteners as seasonal temperature changes can loosen screws over time.
- Avoid common pitfalls like mounting to thin vinyl siding without support, directing water toward the camera, or choosing magnetic mounts in high-traffic areas where theft is a risk.
Why Choosing the Right Mount Matters for Your Blink Camera
The mount isn’t just a bracket, it’s the foundation of your entire security strategy. A poorly chosen or incorrectly installed mount creates coverage gaps, exposes the camera to weather damage, and can even void your warranty if it fails.
Viewing angle is the first concern. Blink cameras have a 110-degree field of view, but that cone of coverage is useless if the mount doesn’t allow you to aim the lens where you need it. A rigid mount on a corner eave might give you a great view of your neighbor’s driveway instead of your own front door. Look for mounts with ball-joint articulation or multi-axis adjustment that let you dial in the exact angle after installation.
Weather resistance is critical for outdoor cameras. The Blink Outdoor models are rated IP65 (dust-tight and protected against water jets), but that protection assumes the camera is mounted correctly. Mounts that trap water against the camera body or block ventilation slots can lead to condensation inside the lens housing. Metal mounts are durable but can corrode in coastal environments unless they’re stainless steel or powder-coated. Plastic mounts resist corrosion but may become brittle in UV exposure over time.
Structural integrity determines how long your installation lasts. A mount screwed into siding without hitting a stud will work for a few weeks, then sag or pull loose. Brick and stucco require masonry anchors, not wood screws. If you’re mounting to vinyl siding, you’ll need to locate the sheathing or framing behind it, surface-mounting to thin vinyl is a recipe for failure.
Types of Blink Camera Mounts: Finding Your Perfect Fit
Blink cameras ship with a basic mount, but it’s designed for general use, not every situation. Depending on your installation surface and coverage needs, you may need a specialized option.
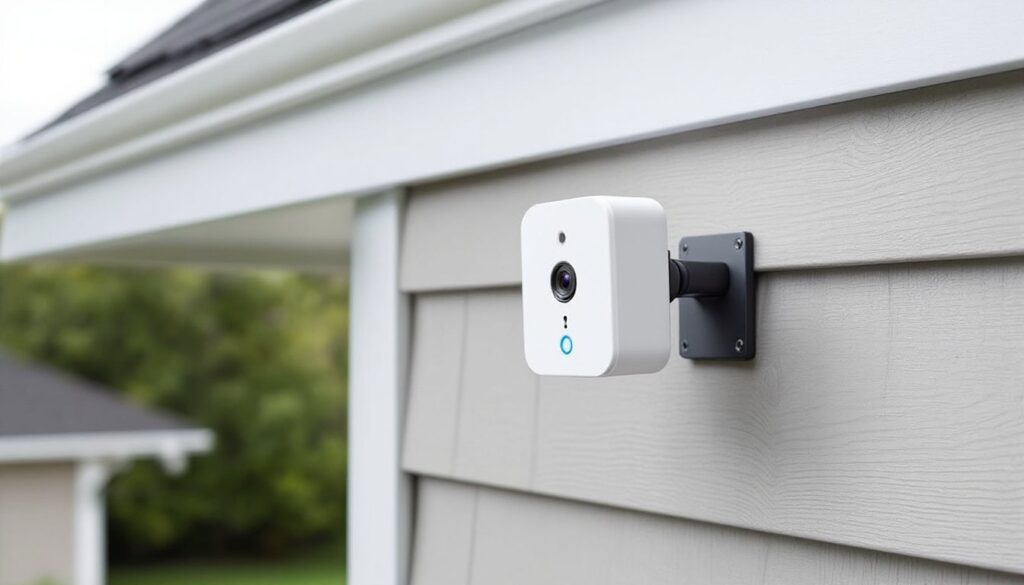
Standard bracket mounts come in the box with most Blink cameras. They’re simple L-brackets with a ball joint that attaches to the camera’s threaded insert (standard 1/4″-20 thread). They work fine for flat surfaces like siding or soffits, but they offer limited range of motion and no protection from tampering. The included screws are #8 x 1.5″ and assume you’re hitting wood framing, not suitable for masonry or metal surfaces.
Corner mounts solve the problem of mounting on outside corners or in tight spaces like porch columns. They use two mounting surfaces instead of one, which spreads the load and often provides better aiming flexibility. Useful when you need to cover two sides of a building from a single camera position.
Gutter mounts clamp onto standard K-style gutters without drilling. They’re ideal for renters or anyone who wants to avoid putting holes in their siding. Look for models with rubber-lined clamps to avoid denting softer aluminum gutters. Be aware that gutter mounts can vibrate in wind, which may trigger motion alerts.
Magnetic mounts attach to metal surfaces like steel doors, shed siding, or mailbox posts. They’re fast to install and reposition, but they’re not secure against theft. Only use magnetic mounts in low-traffic areas or as temporary setups.
Security enclosures add a lockable cage around the camera. They deter tampering and theft, especially in areas with foot traffic. Most enclosures still allow access to the USB charging port and sync button. They do add bulk, so check clearances before ordering.
Official Blink Mounts vs. Third-Party Options
Blink sells proprietary mounts designed specifically for their camera bodies. The Blink Outdoor Floodlight Mount integrates the camera into a motion-activated LED floodlight, a solid choice if you need lighting and surveillance in one package. It requires wiring into a standard outdoor electrical box and may need a permit depending on local codes. The Blink Mini Table Stand is for indoor cameras and provides weighted stability on shelves or desks.
Third-party mounts offer more variety and often better value. Companies like Wasserstein, Holaca, and KOROAO make mounts with enhanced features, longer extension arms, silicone skins for added weather protection, and multi-pack bundles. The trade-off is that smart home device reviews sometimes note fitment issues with third-party accessories, especially after Blink releases updated camera models. Always verify compatibility with your specific Blink model (Outdoor 4, Mini, Video Doorbell, etc.) before purchasing.
Quality varies widely. Check that third-party mounts use stainless steel hardware and UV-resistant plastics. Cheap mounts use zinc-plated screws that rust within months and brittle ABS plastic that cracks in cold weather.
Step-by-Step: How to Install a Blink Camera Mount
Installing a Blink camera mount is straightforward if you prep correctly. Skipping steps, especially locating studs or choosing the wrong fasteners, leads to failed installations.
Materials and Tools Needed:
- Blink camera mount (included or third-party)
- Drill/driver with bits sized to your fasteners
- Stud finder (for wood siding or drywall)
- Masonry bit and anchors (for brick, stone, or stucco)
- Level (a 9″ torpedo level works fine)
- Pencil for marking
- Safety glasses (mandatory when drilling overhead or into masonry)
- Ladder (if mounting above shoulder height)
Step-by-Step Installation:
-
Choose your location. Before drilling anything, hold the camera in position and check the view using the Blink app’s Live View feature. Walk the perimeter to confirm coverage. Mark the spot with a pencil.
-
Locate the framing. Use a stud finder to locate a wall stud, ceiling joist, or solid sheathing behind siding. Wall studs are typically spaced 16″ or 24″ on center. If you can’t hit framing, you’ll need toggle bolts or masonry anchors depending on the substrate.
-
Mark and level the mount. Hold the mount bracket in position and use a level to ensure it’s plumb or level (depending on orientation). Mark the screw hole locations with a pencil. Double-check measurements, most mounts have slotted holes that allow minor adjustment, but it’s better to get it right the first time.
-
Drill pilot holes. For wood, drill a pilot hole slightly smaller than the screw diameter (typically 1/8″ for #8 screws). For masonry, use a carbide-tipped masonry bit sized to match your anchors (usually 3/16″ or 1/4″). Drill to the depth of the anchor plus 1/4″.
-
Insert anchors (if needed). Tap masonry anchors into the holes until flush with the surface. For hollow walls (rare outdoors, but possible under eaves), use toggle bolts or molly anchors rated for at least 15 lbs to handle wind load.
-
Attach the mount. Drive screws through the mount and into the anchors or framing. Tighten until snug, over-tightening can strip threads or crack plastic mounts. The mount should not wiggle when you apply hand pressure.
-
Attach the camera. Thread the camera onto the mount’s ball joint. Most Blink mounts use a thumbscrew or locking clip to secure the camera. Adjust the angle, then tighten the adjustment screw to lock the ball joint in place. Check the view in the app again and make fine adjustments.
-
Test the mount. Give the camera a firm (but not violent) shake to simulate wind. If it moves excessively, check that screws are fully seated and hitting solid material.
Safety notes: Always wear safety glasses when drilling, especially overhead. If you’re working on a ladder, have someone steady it. Don’t drill into walls without checking for electrical wiring or plumbing, use a wire detector if you’re unsure.
Best Mounting Locations for Optimal Security Coverage
Mounting location determines how much coverage you get and whether the camera actually deters intruders. Poor placement creates blind spots and false triggers.
Entry points first. Prioritize front doors, back doors, garage entries, and ground-floor windows. According to FBI statistics, over 80% of break-ins involve a door. Mount cameras 7 to 9 feet high, high enough to avoid tampering but low enough to capture facial details. Aim the camera slightly downward to cover the approach path, not just the threshold.
Avoid backlighting. Don’t aim cameras directly at bright light sources like streetlights, sunrise/sunset positions, or reflective surfaces like windows. Backlighting washes out detail and triggers false motion alerts. If you must cover a backlit area, position the camera to the side so the light source is out of frame.
Consider overlap. If you’re installing multiple cameras, position them so coverage areas overlap slightly. This eliminates blind spots and ensures an intruder can’t avoid all cameras by hugging a wall.
Account for obstacles. Tree branches, decorative trim, and porch columns can block the view or create motion-trigger zones that flood you with false alerts. Clear obstructions within the camera’s field of view, or choose a different mounting point.
Weather exposure. While connected home tech has improved weatherproofing, avoid mounting cameras where they’ll take direct rain or snow. Position them under eaves or soffits when possible. If you must mount in an exposed location, consider a mount with a built-in sunshade or add a separate camera hood.
Wi-Fi signal strength. Blink cameras need a solid connection to the Sync Module. Before finalizing your mounting location, check signal strength in the Blink app. Exterior walls, metal siding, and brick can degrade Wi-Fi signals. If signal is weak, consider relocating the Sync Module or adding a Wi-Fi extender.
Troubleshooting Common Blink Camera Mounting Issues
Even with careful installation, issues pop up. Here’s how to fix the most common mounting problems.
Camera keeps tilting or sagging. This usually means the ball-joint adjustment screw isn’t tight enough, or the mount is pulling away from the surface. Tighten the adjustment screw with a screwdriver, hand-tight isn’t enough. If the mount itself is loose, check that screws are fully seated in solid material. You may need longer screws or better anchors.
Excessive vibration or motion alerts. Wind vibration can trigger motion detection. Switch to a more rigid mount or relocate to a less exposed position. Some users report success by adjusting motion sensitivity settings in the Blink app or enabling Activity Zones to ignore areas where branches move.
Screws won’t bite or strip out. This happens when fasteners don’t match the substrate. If you’re screwing into brick or concrete and the screw spins without tightening, you likely need deeper or larger-diameter masonry anchors. For wood that’s stripped, move the mount 2″ to the side and hit fresh material, or fill the stripped hole with wooden matchsticks and wood glue, let it cure, then re-drill.
Camera won’t stay aimed. If the ball joint won’t hold position even when tightened, the mount may be defective or incompatible with your camera model. Outdoor security camera reviews occasionally mention fitment issues between third-party mounts and updated camera housings. Verify your mount is designed for your specific Blink model.
Water intrusion or fogging. If moisture appears inside the lens, the camera may not be seated correctly in the mount, or the mount is directing water toward the camera. Check that the USB port cover is fully closed and that the mount doesn’t create a water trap. Reposition the camera so the lens faces slightly downward to shed water.
Mount won’t fit the surface. Uneven surfaces like textured stucco or log siding can prevent flat mounts from sitting flush. Use shims (small pieces of plastic or composite) behind the mount to create a flat plane, or switch to a mount with a flexible base or longer standoff.
Conclusion
A properly mounted Blink camera provides reliable security coverage for years with minimal maintenance. Take the time to choose the right mount for your surface and environment, locate solid framing or use appropriate anchors, and position the camera to cover entry points without backlighting or obstructions. Periodically check that screws remain tight and that the camera hasn’t shifted, seasonal temperature swings can loosen fasteners over time. With the right approach, your Blink system will cover the zones that matter and give you the peace of mind that comes from knowing your property is being watched.